The Art of Making Vanilla Extract – Step-by-step Guide to Crafting Your Own Extract
Share
Why Homemade Vanilla Extract Matters
Vanilla extract is more than just a baking ingredient—it’s a timeless flavor that brings warmth, depth, and sweetness to everything from cookies to custards. Yet, not all vanilla extracts are created equal. Many store-bought versions contain artificial flavors, additives, or watered-down concentrates. That’s why learning the art of making vanilla extract at home is a worthwhile skill.
Homemade vanilla extract allows you to control quality, customize the flavor, and ensure that what goes into your recipes is 100% pure. Whether you’re an enthusiastic home baker, a professional chef, or simply someone who values natural ingredients, making vanilla extract is surprisingly simple—and incredibly rewarding.
What is Vanilla Extract?
Vanilla extract is a solution made by soaking vanilla beans in alcohol, allowing the flavors, oils, and aromatic compounds to infuse over time. This infusion creates a rich, dark liquid with complex notes of caramel, spice, and floral sweetness.
The History of Vanilla Extract
Vanilla has a fascinating history that dates back to the ancient Totonac people of Mexico, who first cultivated the plant. It later became prized by the Aztecs, and eventually introduced to Europe in the 16th century. The commercial production of vanilla extract began in the 19th century when chemists discovered how alcohol could efficiently draw out the flavor compounds from the beans.
Commercial vs Homemade Vanilla Extract
-
Commercial Extracts: Often mass-produced, sometimes containing sugar, caramel coloring, or synthetic vanillin.
-
Homemade Extracts: Pure, customizable, and free of unnecessary additives, allowing for a deeper, more authentic flavor profile.
When you make your own vanilla extract, you’re not just replicating what’s on store shelves—you’re creating something superior.
Benefits of Making Vanilla Extract at Home
Cost Savings
Vanilla beans can seem expensive, but when purchased in bulk, they become a cost-effective alternative to buying premium extract. A single batch of homemade extract can last months, saving you money in the long run.
Flavor Quality and Customization
No two vanilla beans are the same. Madagascar beans offer creamy, sweet notes, while Ugandan beans are bold and chocolatey, and Tahitian beans bring floral and fruity flavors. By mixing different types, you can craft a signature blend.
Health Benefits of Pure Extract
Pure vanilla extract contains antioxidants and natural compounds that may support relaxation and reduce inflammation. Unlike imitation extracts, homemade versions don’t contain artificial chemicals.
Essential Ingredients for Homemade Vanilla Extract
Choosing the Right Vanilla Beans
The heart of any extract lies in its beans. Look for plump, oily, and flexible beans. Dry or brittle beans won’t provide the same depth of flavor. Popular types include:
-
Madagascar Bourbon Vanilla: Rich, creamy, and traditional.
-
Ugandan Vanilla: Bold, earthy, with chocolate undertones.
-
Tahitian Vanilla: Floral and fruity, perfect for unique recipes.
Types of Alcohol to Use
Alcohol is the solvent that extracts the compounds from the beans. The most common choices are:
-
Vodka: Neutral flavor, allowing pure vanilla notes to shine.
-
Rum: Adds warmth and depth.
-
Bourbon or Brandy: Provides a richer, spiced profile.
Choose a spirit with at least 35–40% alcohol content for best results.
Additional Flavoring Options
Some makers add cinnamon sticks, citrus peels, or cocoa nibs to create layered, artisanal extracts. While optional, these additions can make your extract truly one-of-a-kind.
Tools and Equipment You’ll Need
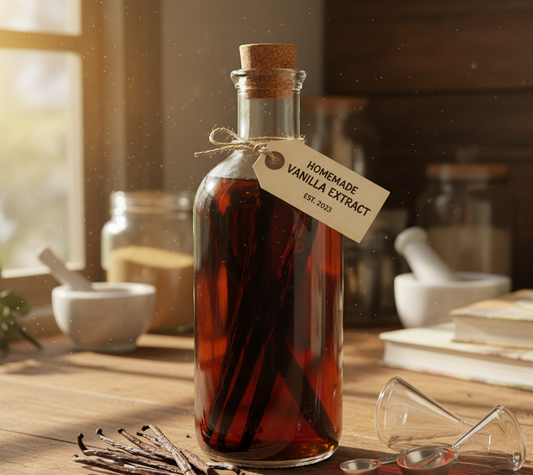
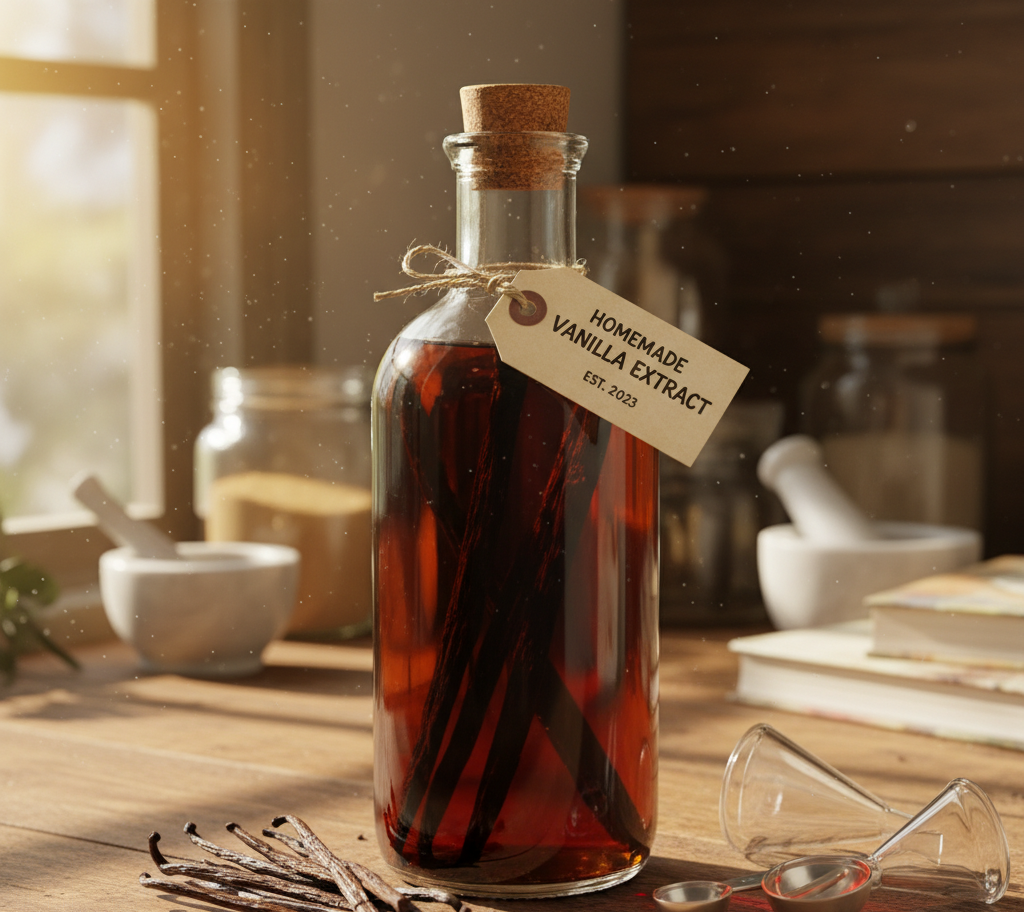
Storage Bottles and Containers
Amber glass bottles are ideal for storing vanilla extract since they protect the liquid from light. Mason jars work well for steeping larger batches.
Measuring Tools
A sharp knife for splitting beans, a funnel for pouring, and a measuring cup for alcohol are all you need.
Step-by-step Guide to Making Vanilla Extract
Step 1: Selecting and Preparing Vanilla Beans
-
Use 5–6 whole vanilla beans per cup of alcohol.
-
Split each bean lengthwise with a sharp knife to expose the seeds.
-
Cut them into smaller pieces if working with shorter bottles.
Step 2: Choosing the Right Alcohol
Pour 1 cup of your chosen alcohol into a clean bottle or jar.
Step 3: Combining Ingredients
Insert the split beans into the container and ensure they are fully submerged. Seal tightly.
Step 4: Storage and Steeping Process
-
Store in a cool, dark place.
-
Shake the jar once a week to redistribute flavors.
Step 5: Testing, Tasting, and Adjusting
Your extract will be usable in as little as 8 weeks, but for the richest flavor, allow at least 3–6 months. Taste periodically and add more beans for stronger flavor if desired.
How Long Does Homemade Vanilla Extract Take?
Patience is the secret ingredient in crafting high-quality vanilla extract. While some impatient bakers might be tempted to use their extract after just a few weeks, the best flavor develops over months of steeping.
-
8 weeks: The extract begins to take on color and light vanilla notes.
-
3 months: Flavor becomes stronger, ideal for everyday baking.
-
6–12 months: Deep, complex flavors emerge, rivaling the most expensive commercial extracts.
Remember, homemade vanilla extract doesn’t “expire” in the traditional sense. The longer it steeps, the richer the taste becomes.
Storing and Preserving Your Vanilla Extract
Shelf Life of Homemade Extract
Properly stored, homemade vanilla extract can last indefinitely. Unlike many pantry staples, the high alcohol content prevents spoilage and preserves the beans.
Proper Storage Conditions
-
Keep your extract in amber glass bottles to protect it from sunlight.
-
Store in a cool, dark cabinet (not the fridge).
-
Top off with more alcohol as the level decreases, keeping beans submerged.
A well-cared-for bottle can provide flavorful vanilla for years without losing potency.
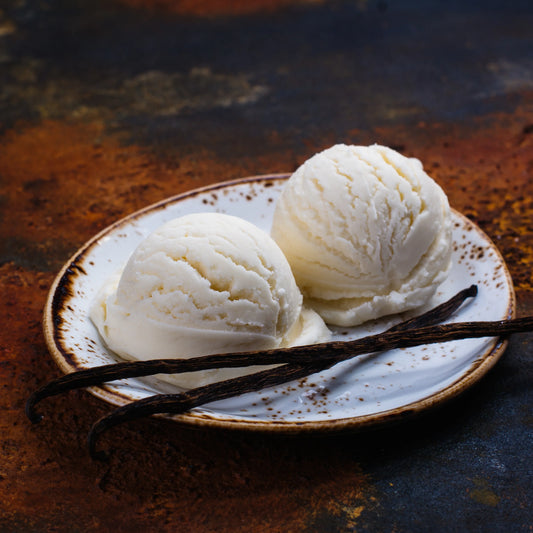
Creative Uses for Homemade Vanilla Extract
Homemade vanilla extract isn’t just for cookies and cakes—it’s a versatile ingredient that enhances countless recipes and even non-culinary products.
In Baking and Cooking
-
Add a teaspoon to cookies, brownies, or bread for a rich aroma.
-
Stir into custards, puddings, or ice cream bases.
-
Use in savory sauces such as tomato or barbecue for a subtle depth.
In Beverages and Cocktails
-
Elevate your morning coffee or hot chocolate with a drop of extract.
-
Mix into smoothies for a natural flavor boost.
-
Create unique cocktails like a vanilla old-fashioned or spiced rum punch.
Non-culinary Uses (candles, body care, etc.)
Vanilla’s soothing scent makes it popular beyond the kitchen. You can:
-
Infuse homemade candles with vanilla extract.
-
Add a few drops to DIY body scrubs or bath salts.
-
Blend into natural perfumes for a warm, sweet note.
Common Mistakes to Avoid
-
Using too few beans: Weakens the extract and delays flavor development.
-
Choosing low-proof alcohol: Anything under 35% won’t properly extract the compounds.
-
Skipping the shake: Regular agitation helps distribute flavor evenly.
-
Storing in clear bottles: Exposure to light degrades quality.
-
Not waiting long enough: Vanilla extract requires patience to reach its full potential.
Tips for Enhancing Flavor
-
Combine different bean varieties (e.g., Madagascar + Ugandan) for a layered profile.
-
Add a cinnamon stick or a touch of cocoa nibs for a gourmet twist.
-
Replace half of the vodka with spiced rum for a warming holiday blend.
-
Use more beans than the minimum for a bolder extract, especially if you bake frequently.
FAQs
1. How many vanilla beans do I need per cup of alcohol?
The standard is 5–6 beans per cup of alcohol. For extra-strong extract, use up to 8 beans.
2. Can I reuse vanilla beans after making extract?
Yes, you can reuse them once or twice. They may be weaker, but still useful in sugar infusions or baking.
3. What’s the best alcohol for vanilla extract?
Vodka is the most common because it has a neutral taste. However, rum, bourbon, and brandy create unique, richer profiles.
4. How long should I steep vanilla extract?
A minimum of 8 weeks is required, but 3–6 months yields optimal flavor.
5. Can I make alcohol-free vanilla extract?
Yes. Use food-grade glycerin instead of alcohol, though the flavor won’t be as deep or long-lasting.
6. Why does my extract look cloudy?
Cloudiness can result from impurities in the alcohol or exposure to heat. It’s usually safe but make sure vanilla beans remain submerged and the extract is stored properly.
Conclusion: Mastering the Art of Homemade Vanilla Extract
Learning how to make vanilla extract at home is an empowering, cost-effective, and rewarding process. With just a few simple ingredients—vanilla beans, alcohol, and patience—you can create a high-quality extract that surpasses commercial brands.
From baking and beverages to skincare and home fragrance, your homemade vanilla extract will find countless uses. Best of all, each bottle reflects your personal touch, whether you choose a classic Madagascar profile, a bold Ugandan blend, or a creative spiced version.