


There's a moment every summer when the heat settles in, the evenings stretch long, and nothing in the freezer aisle quite hits the spot. That's the moment to make your own. Homemade vanilla bean ice cream is one of those rare treats that feels luxurious yet comes together with a handful of honest ingredients : cream, eggs, sugar, and the real star of the show: whole vanilla beans.
If your only experience of vanilla ice cream is the pale, faintly sweet stuff from a tub, you're in for a surprise. Made properly, with real vanilla beans rather than imitation extract, vanilla becomes a deep, floral, almost caramel-like flavour with those unmistakable little black specks throughout. This guide walks you through everything: why vanilla beans matter, the exact recipe, the technique that gives you a silky scoop every time, plus variations, storage tips, and answers to the questions people ask most.
Why Real Vanilla Beans Make All the Difference
Vanilla is the second most expensive spice in the world after saffron, and there's a reason for it. Each pod is hand-pollinated, hand-harvested, and cured over weeks. That labour is exactly what you taste.
When you use a whole vanilla bean instead of a teaspoon of extract, three things happen:
- The flavour is layered, not flat. Real beans carry notes of cream, dried fruit, and a gentle floral warmth that imitation vanilla simply can't reproduce.
- You get the seeds. Those tiny black flecks aren't just for looks — they signal real vanilla and deliver concentrated flavour in every bite.
- The aroma fills the kitchen. Steeping a split bean in warm cream is half the joy of the whole process.
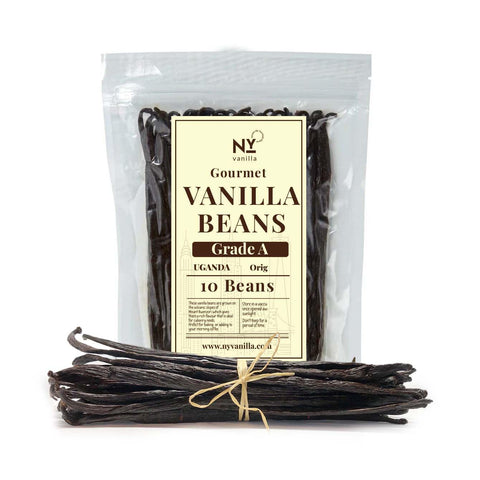
At NY Vanilla, we work with premium Ugandan vanilla beans — a Bourbon-type vanilla known for its bold, rich profile with deep chocolatey and dried-fruit undertones. Because Uganda sits on the equator and harvests twice a year, the beans develop a high vanillin content and a plump, oily texture that's ideal for infusing into cream. For ice cream, that richness is exactly what you want.
Ingredients
This recipe makes roughly 1 litre (about 1 quart) of ice cream — enough for 6 to 8 generous scoops.
- 2 cups (480 ml) heavy cream
- 1 cup (240 ml) whole milk
- ¾ cup (150 g) granulated sugar
- 6 large egg yolks
- 2 whole NY Vanilla vanilla beans, split lengthwise and seeds scraped
- A pinch of fine salt
A quick note on ratios: the higher proportion of cream to milk is what gives this ice cream its luxurious mouthfeel, while the egg yolks create a custard base that stays smooth and resists icy crystals.
Equipment You'll Need
- A medium heavy-bottomed saucepan
- A mixing bowl and whisk
- A fine-mesh sieve
- A thermometer (helpful but not essential)
- An ice cream maker
No ice cream maker? Don't worry — scroll down to the no-churn method further along in this guide.
How to Make Homemade Vanilla Bean Ice Cream
Step 1: Infuse the cream
Pour the cream and milk into your saucepan. Split your vanilla beans down the middle, scrape out the seeds with the back of a knife, and add both the seeds and the empty pods to the pan. Warm everything over medium heat until it just begins to steam — don't let it boil. Once it's hot, take it off the heat, cover, and let it steep for 20 to 30 minutes. This is where the vanilla works its magic.
Step 2: Whisk the yolks
While the cream steeps, whisk the egg yolks, sugar, and salt together in a bowl until the mixture turns pale and slightly thick. This dissolves the sugar and prepares the yolks for the next step.
Step 3: Temper the eggs
Gently reheat the infused cream until warm again. Now, whisking constantly, pour a thin stream of the warm cream into the yolks. Adding it slowly raises the temperature of the eggs gradually so they don't scramble. Once about half the cream is incorporated, pour the whole mixture back into the saucepan.
Step 4: Cook the custard
Cook over medium-low heat, stirring continuously with a spatula, until the custard thickens enough to coat the back of a spoon — around 77–80°C (170–175°F) if you're using a thermometer. Drag your finger across the spoon; if the line holds, it's ready. Don't rush this with high heat, or you'll risk curdling.
Step 5: Strain and chill
Pour the custard through a fine-mesh sieve into a clean bowl to catch the vanilla pods and any stray bits of cooked egg. (Tip: rinse and dry those pods — you can tuck them into a jar of sugar to make vanilla sugar.) Cover and refrigerate for at least 4 hours, ideally overnight. A thoroughly cold base churns into a smoother, creamier result.
Step 6: Churn and freeze
Pour the chilled custard into your ice cream maker and churn according to the manufacturer's instructions, usually 20 to 25 minutes, until it reaches a soft-serve consistency. Transfer to a freezer-safe container, press a sheet of parchment against the surface to prevent ice crystals, and freeze for 4 hours until firm.
Then scoop, and enjoy.
No Ice Cream Maker? Try the No-Churn Method
You can still make wonderful vanilla bean ice cream without any special equipment.
Whip 2 cups (480 ml) of cold heavy cream to stiff peaks. In a separate bowl, stir together one 400 g tin of sweetened condensed milk with the seeds scraped from 2 NY Vanilla vanilla beans. Gently fold the whipped cream into the condensed milk mixture until smooth, then transfer to a container and freeze for at least 6 hours. It's softer and sweeter than the custard version, but wonderfully easy.
Pro Tips for the Perfect Scoop
- Chill everything. A cold base and even a chilled container help the ice cream freeze faster and smoother.
- Don't skip the straining. It guarantees a silky texture free of any cooked egg.
- Add a spoon of alcohol. A tablespoon of vodka or bourbon (the flavour cooks off) lowers the freezing point slightly, keeping your ice cream scoopable straight from the freezer.
- Let it rest before scooping. Five minutes at room temperature softens it to the perfect consistency.
Delicious Variations to Try
Once you've mastered the base, the possibilities open up:
- Vanilla bean and honey — swirl in a little raw honey for floral depth.
- Roasted strawberry — fold in roasted, mashed strawberries during the last minutes of churning.
- Salted caramel — ripple caramel sauce through before freezing.
- Coffee and vanilla — steep a tablespoon of coffee beans alongside the vanilla for an affogato-ready treat.
- Chocolate chunk — stir in chopped dark chocolate as it finishes churning.
How to Store Homemade Ice Cream
Keep your ice cream in an airtight, freezer-safe container with parchment pressed against the surface. Stored this way, it stays at its best for up to two weeks, though the texture is creamiest within the first few days. For the smoothest scoop, store it toward the back of the freezer where the temperature is most stable, not in the door.
Frequently Asked Questions
Can I use vanilla extract instead of beans? You can, but you'll lose the depth and the signature flecks. If substituting, use 1 tablespoon of pure vanilla extract and stir it in after the custard has cooled. For the richest flavour, whole beans are always worth it.
Why is my ice cream icy? This usually comes down to a base that wasn't cold enough before churning, or slow freezing afterward. Chill the custard fully, freeze quickly, and press parchment against the surface to limit ice crystals.
How many vanilla beans should I use? Two beans gives a pronounced, true vanilla flavour for a litre of ice cream. If you love a strong vanilla hit, you can push it to three.
Can I make this recipe without eggs? Yes — the no-churn method above is completely egg-free, and still delivers a creamy result.
How long does homemade vanilla bean ice cream last? Up to two weeks in the freezer in an airtight container, though it's at its creamiest within the first week.
The Sweetest Way to Spend Summer
Making homemade vanilla bean ice cream is one of those small rituals that pays you back tenfold — the smell of vanilla steeping in warm cream, the anticipation as it churns, and that first cold, fragrant spoonful on a hot afternoon. Once you've tasted ice cream made with real beans, the tub version never quite measures up again.
The single thing that elevates this recipe above any other is the quality of your vanilla. Shop NY Vanilla's premium Ugandan vanilla beans and taste the difference real vanilla makes — in your ice cream, and in everything else you bake this summer.
0 comments